Plakar is an open source backup tool created by a French team. In this article, you’ll learn how to install it, create your first backups, restore them, and automate everything, with step-by-step explanations and examples.
Introduction
Losing important files doesn’t only happen to other people. Whether it’s a disk failure, a mistake, or ransomware, a solid backup strategy is essential. The hard part is finding the right tool. Plakar is an open source backup solution developed by a French company, and more specifically by two French engineers: Gilles Chehade and Julien Mangeard. It stands out from popular alternatives like Restic or BorgBackup in several ways: a built-in graphical interface, an immutable snapshot system called Klosets, flexible retention policies, and clear documentation from version 1.0 onward.
In this article, we’ll walk through how to:
- Install Plakar (on Debian)
- Create a repository and run your first backups
- Restore files in a few commands
- Automate your backups with cron and systemd
- Use the graphical interface to manage your snapshots visually
Whether you’re a curious Linux user or a system administrator, this guide will help you get started with Plakar from A to Z.
Installation
Installing Plakar on your PC or server is straightforward. Everything is clearly explained in the documentation, and you just need to follow the steps. A few commands later, you’re done.
Start by installing the dependencies and the repository GPG key, then install Plakar:
# Update packages and install dependencies
sudo apt-get update
sudo apt-get install -y curl gnupg2

# Configure the Plakar repository
curl -fsSL https://plakar.io/dist/keys/community-v1.0.0.gpg | sudo gpg --dearmor -o /usr/share/keyrings/plakar.gpg
echo "deb [signed-by=/usr/share/keyrings/plakar.gpg] https://plakar.io/dist/repos/deb/ stable main" | sudo tee /etc/apt/sources.list.d/plakar.list

# Install Plakar
sudo apt-get update
sudo apt-get install plakar
Verify that Plakar is installed by checking the version:
kilian@debian:~$ plakar version
plakar/v1.0.6
I’m currently running version v1.0.6. For other operating systems (macOS, Windows) or alternative installation methods, see the official documentation.
Creating the Kloset Store
Before backing up anything, you need to create a Kloset Store (also called a repository). This is where your backups will be stored. For more details on what a Kloset is, Plakar has written an article that explains it: Kloset: the immutable data store
Good to know: Plakar uses the keyword at to specify the Kloset Store used in a command.
To create a Kloset in my home directory:
plakar at $HOME/kloset createQuick reminder: $HOME corresponds to /home/kilian (or your username). The Kloset will therefore be created at /home/kilian/kloset/.
Passphrase security
Plakar will ask you to set a passphrase. It must meet a minimum entropy of 80 (at least one special character, one uppercase letter, one number, and sufficient length). If you try a weak passphrase (like “azerty” or “Azertyuiop&1”), you’ll get this message: “insecure password, try including more special characters, using uppercase letters, using numbers or using a longer password”
If you’re not sure what entropy means, I recommend this article on the Proton blog: What is password entropy?
Why this requirement? Plakar uses the Go module go-password-validator to ensure your password is strong. If you fail several times, you’ll need to start the Kloset creation over. A good security practice from the start.
So choose a strong passphrase and keep it safe, because anyone who has it can read all the backups in the repository.
Example of a valid passphrase: CorrectHorseBatteryStaple&2026! (adapt it, of course).
Once created, your Kloset will look like this:
kilian@debian:~$ ls -l kloset/
total 16
-rw-------   1 kilian kilian  656 Mar 27 11:26 CONFIG     # Configuration file
drwx------   2 kilian kilian 4096 Mar 27 11:26 locks      # Locks to prevent conflicts
drwx------ 258 kilian kilian 4096 Mar 27 11:26 packfiles  # Data storage
drwx------ 258 kilian kilian 4096 Mar 27 11:26 states # Snapshot metadataNote: I will sometimes refer to a “snapshot” when talking about a backup. They mean the same thing.
First backup
To create a backup, just tell Plakar which repository to use and which file or folder to back up. The data will be stored in the chosen Kloset Store.
For example, if I want to back up my $HOME/Documents folder, I just run the following command:
plakar at $HOME/kloset backup $HOME/DocumentsPlakar will ask for your passphrase, then show the progress:
d6cdaa6c: OK ✓ /home/kilian/Documents/bank.odt
d6cdaa6c: OK ✓ /home/kilian/Documents/important.txt
d6cdaa6c: OK ✓ /home/kilian/Documents/photos/photo1.jpg
[...]
info: backup: created unsigned snapshot d6cdaa6c of size 5.0 MiB in 62.898795ms (wrote 106 KiB)d6cdaa6cis the unique snapshot ID (an immutable hash). It identifies the snapshot and is used in many plakar commands.
Congratulations, your first Plakar backup is ready!
Essential plakar commands
List snapshots (ls)
To list all snapshots in a Kloset Store, use the ls command:
kilian@debian:~$ plakar at $HOME/kloset ls
repository passphrase:
2026-03-27T10:42:54Z   d6cdaa6c   5.0 MiB        0s /home/kilian/Documents
I only have one snapshot in my kloset repository. Several fields in the output are worth noting (example for the Documents snapshot):
- 2026-03-27T10:42:54Z: snapshot creation date
- d6cdaa6c: snapshot ID
- 5.0 MiB: total size
- 0s: processing time
- /home/kilian/Documents: path of the backed-up file or folder
You can also list the contents of a snapshot without extracting files. Just append the snapshot ID to the command:
kilian@debian:~$ plakar at $HOME/kloset ls d6cdaa6c
repository passphrase:
2026-03-27T10:31:03Z -rw-r--r--   kilian   kilian   14 KiB bank.odt
2026-03-27T10:30:13Z -rw-r--r--   kilian   kilian  2.1 KiB important.txt
2026-03-27T10:35:47Z drwxr-xr-x   kilian   kilian  4.0 KiB photos
The output is similar to a plain ls -al, and hidden files (starting with a dot) are shown as well.
Verify integrity (check)
To verify a snapshot’s integrity and make sure files haven’t been corrupted (especially useful if your backups are on an external drive or in the cloud), use the check command.
To verify the integrity of all snapshots:
kilian@debian:~$ plakar at $HOME/kloset check
repository passphrase:
info: d6cdaa6c: ✓ /home/kilian/Documents
info: d6cdaa6c: ✓ /home/kilian/Documents/bank.odt
info: d6cdaa6c: ✓ /home/kilian/Documents/photos
[...]
info: check: verification of d6cdaa6c:/home/kilian/Documents completed successfully
To verify the integrity of a single snapshot by ID:
kilian@debian:~$ plakar at $HOME/kloset check d6cdaa6c
repository passphrase:
info: d6cdaa6c: ✓ /home/kilian/Documents
info: d6cdaa6c: ✓ /home/kilian/Documents/bank.odt
info: d6cdaa6c: ✓ /home/kilian/Documents/photos
[...]
info: check: verification of d6cdaa6c:/home/kilian/Documents completed successfully
Restore files (restore)
To restore one or more files from a plakar backup, use the restore command. There are several ways to use it. You can let plakar decide where files are restored, or specify exactly where you want the backup restored.
Option 1: Default restore
Plakar creates a plakar-YYYYMMDDHHMMSS folder in the current directory:
# Full restore
kilian@debian:~$ plakar at $HOME/kloset restore
repository passphrase:
info: d6cdaa6c: OK ✓ /home/kilian/Documents
info: d6cdaa6c: OK ✓ /home/kilian/Documents/bank.odt
info: d6cdaa6c: OK ✓ /home/kilian/Documents/photos
info: d6cdaa6c: OK ✓ /home/kilian/Documents/important.txt
[...]
info: restore: restoration of d6cdaa6c:/home/kilian/Documents at /home/kilian/plakar-20260327115250 completed successfully

# Verify the restore
kilian@debian:~$ ls -al plakar-20260327115250/Documents/
total 32
drwx------ 3 kilian kilian  4096 Mar 27 11:52 .
drwx------ 3 kilian kilian  4096 Mar 27 11:52 ..
-rw-r--r-- 1 kilian kilian 14820 Mar 27 11:31 bank.odt
-rw-r--r-- 1 kilian kilian  2194 Mar 27 11:30 important.txt
drwxr-xr-x 2 kilian kilian  4096 Mar 27 11:35 photos
The folder where the snapshot was restored is named plakar-20260327115250. And I can see the Documents folder I had backed up, with the files and subfolders inside.
Option 2: Restore a specific file
You can also restore only a file or folder from a snapshot. Let’s say I want to restore the important.txt file I backed up earlier. I just need to give the path relative to the snapshot:
kilian@debian:~$ plakar at $HOME/kloset restore d6cdaa6c:important.txt
repository passphrase:
info: d6cdaa6c: OK ✓ /home/kilian/Documents/important.txt
info: restore: restoration of d6cdaa6c:/home/kilian/Documents/important.txt at /home/kilian/plakar-20260327115511 completed successfully
Here I provide the path from snapshot d6cdaa6c using d6cdaa6c:important.txt. No need to specify that the file is in Documents, because the snapshot is equivalent to the path I gave when backing up. To put it simply, d6cdaa6c = /home/kilian/Documents/.
Option 3: Choose the destination folder
If I want to tell Plakar exactly where to restore my backup, I can use the -to flag (if the destination folder doesn’t exist, Plakar will create it):
# Restore to a specific location
kilian@debian:~$ plakar at $HOME/kloset restore -to $HOME/Restore-Documents/ d6cdaa6c
repository passphrase:
info: d6cdaa6c: OK ✓ /home/kilian/Documents
info: d6cdaa6c: OK ✓ /home/kilian/Documents/bank.odt
info: d6cdaa6c: OK ✓ /home/kilian/Documents/photos
info: d6cdaa6c: OK ✓ /home/kilian/Documents/important.txt
[...]
info: restore: restoration of d6cdaa6c:/home/kilian/Documents at /home/kilian/Restore-Documents/ completed successfully

# Verify the restore
kilian@debian:~$ ls -l Restore-Documents/Documents/
total 24
-rw-r--r-- 1 kilian kilian 14820 Mar 27 11:31 bank.odt
-rw-r--r-- 1 kilian kilian  2194 Mar 27 11:30 important.txt
drwxr-xr-x 2 kilian kilian  4096 Mar 27 11:35 photos
Breaking down the command:
plakar at $HOME/kloset: Kloset Store containing the snapshotrestore: the plakar command to run-to $HOME/Restore-Documents/: sets the location where I want to restore my filesd6cdaa6c: snapshot ID to restore
Option 4: Restore to the original location
Plakar can also restore a file or folder to where it originally was. For example, if I want to restore my important.txt file from my snapshot, I can simply specify the file location:
kilian@debian:~$ plakar at $HOME/kloset restore -to $HOME/Documents/ d6cdaa6c:important.txt
repository passphrase:
info: d6cdaa6c: OK ✓ /home/kilian/Documents/important.txt
info: restore: restoration of d6cdaa6c:/home/kilian/Documents/important.txt at /home/kilian/Documents/ completed successfully
My important.txt file was successfully restored to /home/kilian/Documents.
⚠️ Warning: Existing files will be overwritten. Be careful about where you restore files so you don’t overwrite something important. To stay safe, restore to a dedicated folder first.
Delete a snapshot (rm)
To test snapshot deletion, I made a second backup of my Documents folder. When I list the backups in my repository, I can see both snapshots:
kilian@debian:~$ plakar at $HOME/kloset ls
repository passphrase:
2026-03-27T12:30:06Z   1afe4341   5.0 MiB        0s /home/kilian/Documents
2026-03-27T10:42:54Z   d6cdaa6c   5.0 MiB        0s /home/kilian/Documents
Now, if I want to delete one of the two snapshots in my repository, I just use the rm command:
kilian@debian:~$ plakar at $HOME/kloset rm d6cdaa6c
repository passphrase:
rm: would remove these 1 snapshot(s), run with -apply to proceed
2026-03-27T10:42:54Z   d6cdaa6c   5.0 MiB        0s /home/kilian/Documents
Plakar tells me that to actually apply the deletion, I need to run the command with the -apply flag:
kilian@debian:~$ plakar at $HOME/kloset rm -apply d6cdaa6c
repository passphrase:
info: rm: removal of d6cdaa6c completed successfully
The snapshot was deleted. I can verify by listing the snapshots in my repository again:
kilian@debian:~$ plakar at $HOME/kloset ls
repository passphrase:
2026-03-27T12:30:06Z   1afe4341   5.0 MiB        0s /home/kilian/Documents
Important note: deleting snapshots doesn’t actually free up space on your machine. Plakar handles this with the maintenance command, which removes blobs, objects, and chunks from the repository to reduce storage usage.
Retention policies (policy)
To automate deletion of old backups, create a custom retention policy with the policy command. For example, if I want to create a retention policy named daily that keeps 1 snapshot per day and deletes those older than 6 months:
# Create the policy
plakar policy add daily

# Keep only one snapshot per day
kilian@debian:~$ plakar policy set daily per-day=1

# Keep only snapshots less than 6 months old
kilian@debian:~$ plakar policy set daily since='6 months'
Many options are available. See plakar help policy or the documentation for more details.
Graphical interface
One of Plakar’s advantages over similar tools is its built-in web interface, with no extra installation required. To launch it:
kilian@debian:~$ plakar at $HOME/kloset ui
repository passphrase:
launching webUI at http://localhost:25076?plakar_token=11b35487-1fe6-4ac8-837d-f13b82213000
Open the displayed URL in your browser. Note that the plakar_token in the URL authenticates your session (without it, access is denied). Keep it if you want to reopen the interface later without rerunning the command (or use the -no-auth option to disable authentication on a trusted network).
From this graphical interface, you can view repository snapshots, restore files, delete them, and more.
Main dashboard
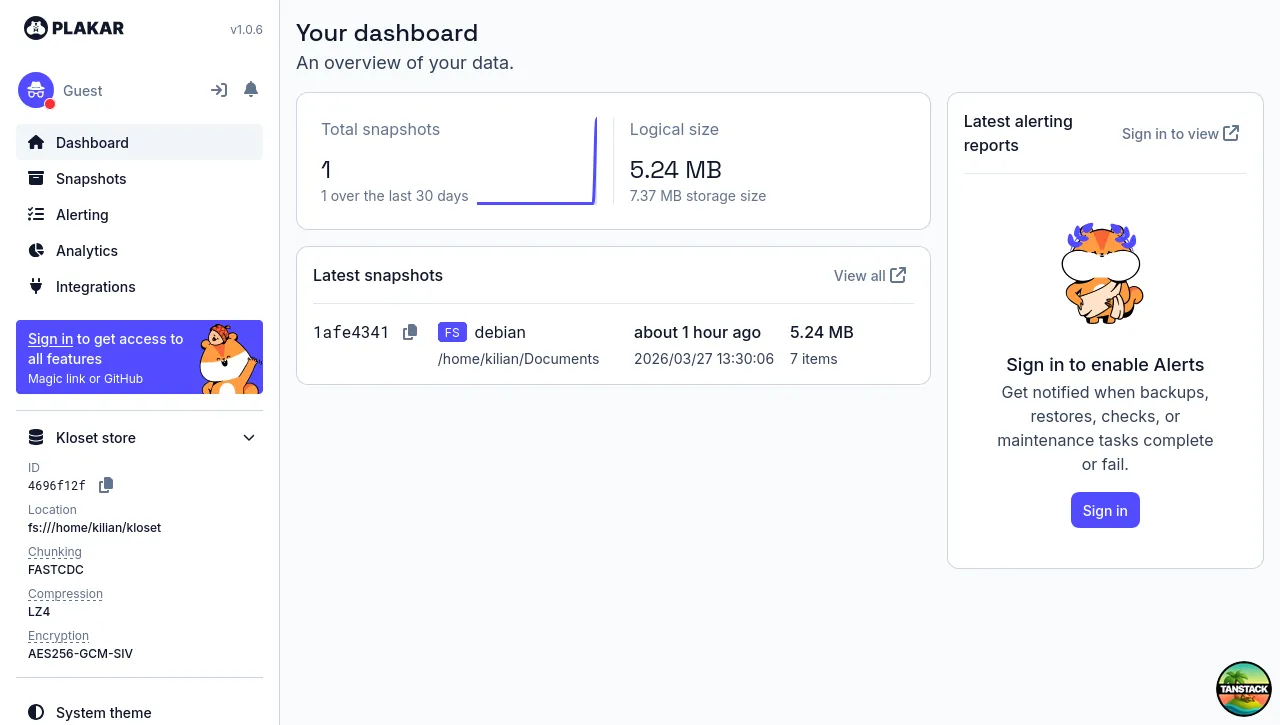 The dashboard gives you an overview of the Kloset store:
- General information: total size used, number of snapshots, deduplicated space saved
- Latest snapshots: list of recent backups with their date, location, size, and ID
- Usage chart: storage usage over time, useful for spotting abnormal growth
This is the ideal page for a quick health check of your backups without opening a terminal.
Browsing a snapshot
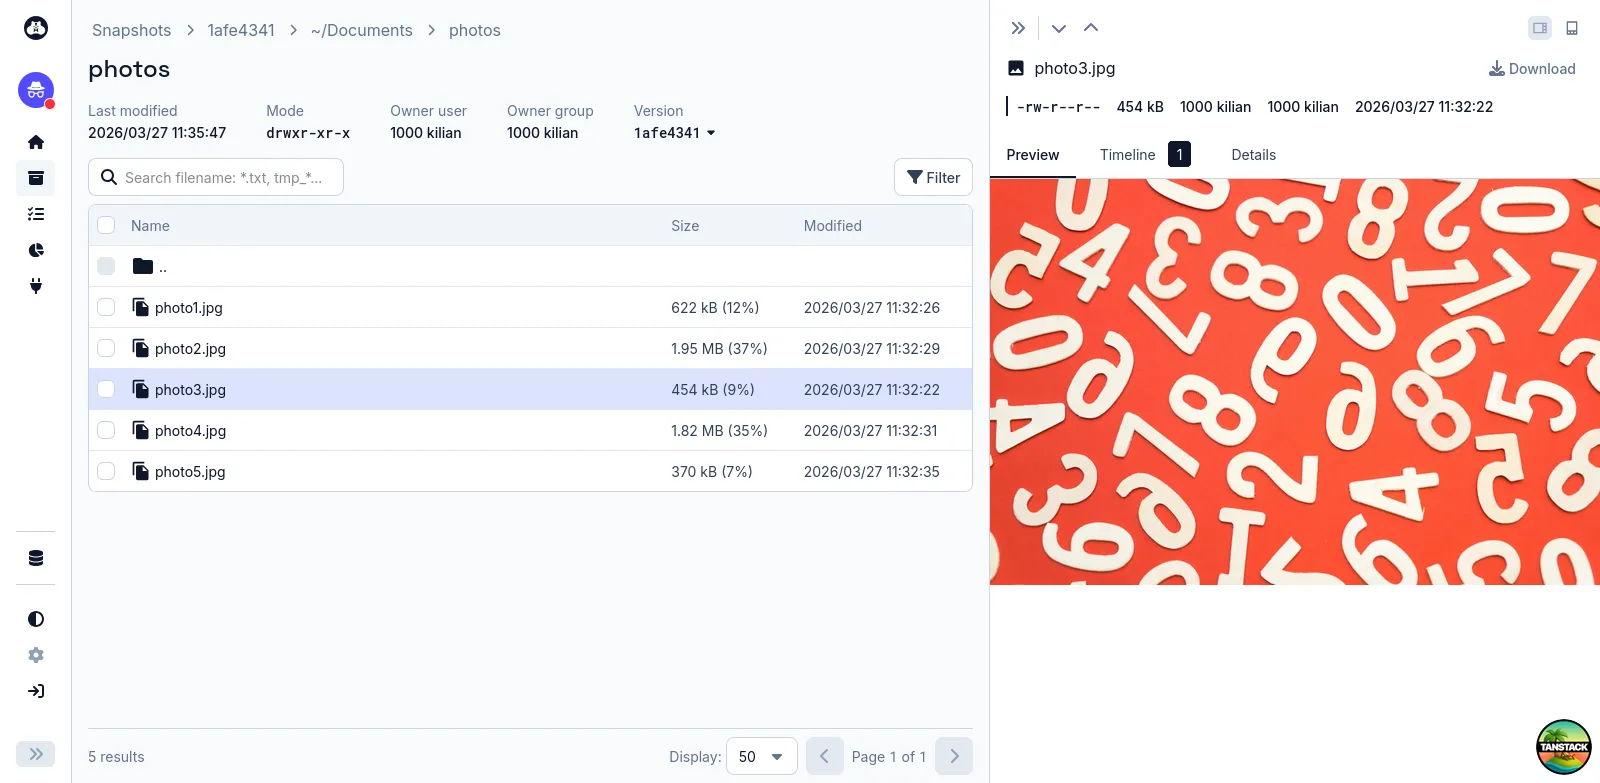 Clicking on a snapshot lets you browse its contents like a regular file explorer:
- Browse the directory tree of backed-up folders and files
- Preview certain file types directly in the browser
- Download a file in one click, without using the terminal
- View changes to files across different snapshots
This is especially useful for quickly finding a specific file across multiple snapshots, without running ls or restore commands.
Automating Plakar with cron and systemd
Plakar can be fully automated, whether to schedule regular backups or run the graphical interface in the background. Here’s how to do it with cron and systemd.
1. Prepare automation
To automate Plakar without manual intervention, you need to configure access to the repository passphrase. Here’s the recommended approach:
Step 1: Initialize the store
Start by adding your Kloset Store to the Plakar configuration:
plakar store add mystore location=$HOME/klosetmystoreis the name I give to the store I created. It’s an alias forlocation=$HOME/kloset, which is where my Kloset store lives
This command creates an entry in ~/.config/plakar/stores.yml with your store location:
version: v1.0.0
stores:
  mystore:
    location: /home/kilian/kloset
Step 2: Add the passphrase manually
Edit the configuration file to add the passphrase:
nano ~/.config/plakar/stores.ymlAdd the passphrase line (replace XXX with your passphrase):
version: v1.0.0
stores:
  mystore:
    location: /home/kilian/kloset
    passphrase: "XXX"
Step 3: Secure the file
The file should already be secured by default, but it doesn’t hurt to check. It should only have read and write permissions for the file owner:
$ ls -l .config/plakar/stores.yml
-rw------- 1 kilian kilian 116 Mar 31 06:35 .config/plakar/stores.yml
If that’s not the case, fix the file permissions:
chmod 600 ~/.config/plakar/stores.ymlI could also have added the passphrase= option to the store initialization command to add the passphrase directly to the configuration file, but I don’t like putting the passphrase in plain text on the command line, because it shows up in command history and logs. I also noticed there was a bug when the ”$” character was present in the passphrase.
EDIT: it’s not a Plakar bug, but the shell misinterpreting part of the passphrase as a variable reference, which in my case was empty. Use single quotes or escape the ”$” with a backslash \.
Another option is to use a secret manager like HashiCorp Vault or 1Password CLI. For more details, see the documentation.
2. Schedule backups with cron
cron is the ideal tool for running backups at regular intervals (every hour, every day, etc.).
Step 1: Edit the crontab
Open your crontab with:
crontab -eStep 2: Add a backup task
To back up your Documents folder every day at 2 a.m.:
0 2 * * * /usr/bin/plakar at @mystore backup $HOME/Documents >> $HOME/plakar-backup.log 2>&10 2 * * *: Runs daily at 2:00 a.m.@mystore: Name of the store (or alias) I configured above, pointing to my repository at$HOME/kloset. This lets Plakar use the passphrase configured in~/.config/plakar/stores.yml.>> $HOME/plakar-backup.log 2>&1: Logs are saved to a file for review.
3. Launch the graphical interface automatically with systemd
Step 1: Create the service file
sudo nano /etc/systemd/system/plakar-ui.serviceAdd this content:
[Unit]
Description=Plakar Web UI
After=network.target

[Service]
User=kilian		# Replace with the correct user
Group=kilian	# Replace with the correct group
ExecStart=/usr/bin/plakar at @mystore ui -addr localhost:9090 -no-spawn
Restart=always
WorkingDirectory=/home/kilian

[Install]
WantedBy=multi-user.target
Step 2: Enable the service
sudo systemctl daemon-reload
sudo systemctl enable plakar-ui.service
sudo systemctl start plakar-ui.service
The interface will be available at http://localhost:9090. However, the Plakar graphical interface requires a token to authenticate the connection. There are two options:
- Option 1: retrieve the token from the service logs (see step 3 below)
- Option 2: add the
-no-authoption at the end of theExecStartcommand in the service configuration file (see step 1 above)
Step 3: Verify the service
systemctl status plakar-ui.service
journalctl -u plakar-ui.service -f  # Watch logs in real time
You can now enjoy the many benefits of the graphical interface!
Other useful commands
Plakar offers advanced features for deeper backup management. Here are a few:
| Command | Description | Example |
|---|---|---|
mount | Mounts a snapshot as a filesystem, giving you direct access to its contents. | plakar at $HOME/kloset mount /mnt/backup |
prune | Cleans up unreferenced data to free space. | plakar at $HOME/kloset prune |
sync | Syncs a local repository with a remote one (via SSH, for example). | plakar at $HOME/kloset synch to ssh://user@host/remote/kloset |
archive | Exports a snapshot to an archive (.tar, .tar.gz, .zip). Note: A known bug is tracked here. | plakar at $HOME/kloset archive -output backup.tar.gz -format tarball d6cdaa6c |
To explore all available options, see the official documentation.
Conclusion
You now know how to install Plakar, create backups, restore them, and manage them effectively. It’s a tool that ticks a lot of boxes: open source, French-made, easy to get started with, secure by design, and with a built-in graphical interface that makes it accessible even without the terminal.
If you want to go further, Plakar also supports syncing to remote repositories via SSH, mounting snapshots as filesystems, and exporting to archives. And that’s not all: Plakar offers a list of integrations covering a wide range of storage services. On the consumer cloud side, you’ll find Google Drive, OneDrive, Dropbox, iCloud Drive, Proton Drive, OpenDrive, and Koofr (these integrations rely on rclone). For more specialized use cases, Plakar also integrates with S3, MinIO, and SFTP/SSH. You can even back up services like Notion directly from Plakar. The official documentation covers setup for each of these integrations.
One feature to watch closely: Plakar’s Proxmox integration. It will let you back up virtual machines and containers directly from Plakar, without going through Proxmox’s native tools. This integration is still in testing and isn’t available in the current stable release, but I’ll try it soon in a new article. In the meantime, you can check the development documentation to learn more.